Table of Contents
- What Exactly Are the Northern Lights?
- Understanding the Kp Index: The Traffic Light of Space Weather
- The Enemy: Cloud Cover and Forecasts
- Timing Your Trip: Why the Moon Matters
- Tools of the Trade: Apps and Websites
- A Personal Night in the Arctic: The Reality Check
- Dressing for the Occasion: The Art of Layering
- Safety First: Don’t Get Lost in the Dark
So, you want to see the Northern Lights.
Honestly, who doesn’t? It is that magical, green curtain hanging in the sky that feels like something straight out of a fantasy novel.
But if you just book a random trip to Norway or Iceland hoping for the best, you might come back disappointed.
I have been chasing the aurora for years, and let me tell you, it is not just about being in the right place.
It is about reading the signs. But there’s a catch.
There is a whole science behind predicting when the sun will throw a tantrum and paint our skies.
What Exactly Are the Northern Lights?
Okay, so we all know they are pretty, but what is actually happening up there? Basically, the sun is always blowing a solar wind toward Earth.
Sometimes this wind is weak, and sometimes it is strong.
When it hits our magnetic field, it gets all excited and releases energy.
This energy slams into atoms in the atmosphere, like oxygen and nitrogen, and makes them glow.
It is basically a massive, planet-sized light show that we get to watch from the ground.
It is really kind of wild when you think about it. And this is where things get interesting.
The colors depend on which gas is hitting what altitude.
Green is oxygen at lower altitudes, and sometimes you get reds and purples if the energy is super high. And this is where things get interesting.
But mostly, it is that beautiful, shifting green that makes people freeze in their tracks.
Understanding the Kp Index: The Traffic Light of Space Weather
This is where the real work starts.
You can’t just go outside and hope for the best; you have to look at the Aurora Forecast.
The main number you need to learn is the Kp index.
Think of this like a traffic light for space weather.
It goes from 0 to 9.
- Kp 0-2: Quiet.
You probably won’t see anything unless you are already right at the North Pole.
- Kp 3-4: Active. Now think about that for a second.
If you are in Iceland or southern Alaska, you might catch a glimpse.
- Kp 5-6: High.
This is where the magic happens. Now think about that for a second.
The lights can be seen as far south as New York or northern Europe.
- Kp 7-9: Extreme.
The sky will be full of dancing ribbons.
You basically don’t need to sleep.
Now, here is the thing I learned the hard way.
Just because the Kp index is high doesn’t mean you will see it.
I have sat in a hotel room in Tromsø watching the numbers hit 7, and then looked out the window to see nothing but rain.
Why? Because of the clouds.
This brings us to the next hurdle.
The Enemy: Cloud Cover and Forecasts
If there is one thing that will ruin your aurora chase faster than a boring solar cycle, it is cloud cover. Oddly enough,
Even if the solar wind is screaming at our magnetic field, if there is a thick blanket of white stuff blocking the view, you are out of luck.
So, you need to look at both the space weather and the local weather.
There is a specific type of cloud forecast that meteorologists use for aurora hunters.
It is called total cloud cover.
You need to find a spot where the sky is clear.
I remember one night in Finnish Lapland, the aurora forecast was predicting a Kp of 5.
I was so ready.
I packed my thermals, grabbed my camera, and drove out to a frozen lake.
But the clouds were rolling in from the south.
I sat there for two hours, freezing my butt off, watching the sky get darker and cloudier.
I had to go home empty-handed. Here’s the interesting part.
It was a bummer, but it taught me that checking the forecast is useless if you don’t check the cloud map.
You can use services like Meteoblue or specific aurora apps that overlay cloud data.
If the cloud forecast is red, don’t even bother packing your camera.
Timing Your Trip: Why the Moon Matters
So you have the space weather and the clouds figured out.
There is one more thing that people often forget: the moon.
The moon is nature’s spotlight, and when it is full, it washes out the sky.
If you are trying to photograph the lights, a full moon is going to make your pictures look like daytime photos.
If you just want to stare in awe, a bright moon can be distracting.
Ideally, you want a new moon.
That is when the sky is darkest, and the faintest glimmers of the aurora will actually be visible.
Planning a trip around the lunar cycle might sound a bit obsessive, but trust me, it is worth it.
Most aurora forecast websites will show you the moon phase.
I usually plan my trips for the weeks leading up to the new moon.
That way, even if the Kp index is only average, I have a fighting chance of seeing something really bright and clear.
It is all about maximizing the contrast between the dark sky and the colored lights.
Tools of the Trade: Apps and Websites
Alright, so where do you actually find this information? It is not like you can just look at the sky and know.
You need the right tools in your pocket.
There are a few specific sites that are pretty reliable.
AuroraWatch is a classic one that sends alerts to your phone when the activity is picking up.
Then there is SpaceWeatherLive, which is fantastic for checking the real-time solar wind speed and IMF (Interplanetary Magnetic Field) data.
This is for the serious nerds among us, but it really helps you understand if the lights are going to be active or not.
For the casual observer, there are apps like My Aurora Forecast or PhotoPills.
These are super user-friendly.
They show you the Kp index, the cloud cover, and the moon phase all in one place.
Honestly, I have downloaded so many of them.
But if you are just starting out, just stick to one good app and learn how to read the graphs. Oddly enough,
Don’t overwhelm yourself with too much data.
The goal is to know when to look up, not to become an astrophysicist overnight.
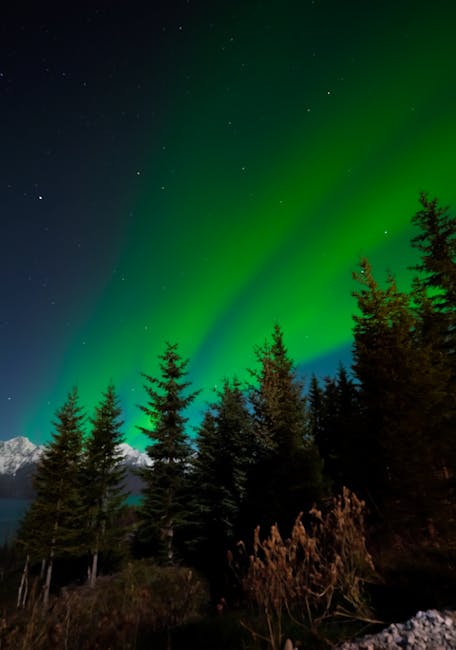
A Personal Night in the Arctic: The Reality Check
Let me tell you a story about my very first successful hunt.
It was in the Swedish Lapland, and the conditions were perfect.
The Kp index was 6, the sky was cloud-free, and the moon was new.
I was with a guide who knew exactly where to go.
We drove out to a snow-covered hillside.
The temperature was dropping fast, maybe around -15 degrees Celsius.
My fingers were numb inside my gloves, and my nose felt like it was dripping ice water.
But then, it started.
It wasn’t a flicker at first; it was a steady glow on the horizon.
Then, the curtain effect kicked in.
The green waves started undulating over the top of the mountain.
It was silent.
The only sound was the crunch of snow under our boots.
There is a moment when you are standing there, shivering, waiting, and suddenly the silence breaks because you are gasping.
You can’t believe what you are seeing. But there’s a catch.
It feels like the planet is alive.
I spent the next three hours just watching it, completely forgetting about the cold.
It is a feeling that I still get chills thinking about.
But here is the reality check: it doesn’t happen every night.
That is why the forecast is so important. And this is where things get interesting.
You have to be patient.
Dressing for the Occasion: The Art of Layering
Now, let’s talk about getting ready for the hunt.
You cannot wear a t-shirt and a denim jacket.
If you do, you will be miserable and you won’t last five minutes.
You need to dress like an onion.
Base layer: thermal underwear.
Mid layer: fleece or a down jacket.
Outer layer: a waterproof, windproof parka.
And don’t forget the extremities.
Mittens are better than gloves because your fingers share heat.
Scarves are essential to keep the wind out of your neck.
And don’t forget thick socks. And this is where things get interesting.
Good luck finding them, but you need them.
I usually pack an extra pair of socks just in case I get snow in my boots.
It sounds silly, but having wet socks is the quickest way to ruin a trip.
Also, bring a thermos of hot chocolate.
That warmth inside you makes the cold outside feel a little more bearable.
You want to be warm so you can focus on the lights, not shivering.
Safety First: Don’t Get Lost in the Dark
This is something I see people overlook way too often.
When you are out in the middle of nowhere, in the pitch black of the Arctic winter, with no streetlights and snow covering the ground, it is incredibly easy to get disoriented.
If you decide to go off-trail to get a better angle, you have to be careful.
Always go with a guide if you are new to this.
They know the terrain.
Carry a flashlight or headlamp.
But use red light if you can.
White light scatters in the snow and ruins your night vision, which is exactly what you need to see the aurora.
If you are driving, be super careful. But there’s a catch.
The snow reflects the light from the aurora itself, which can make the road look very bright, but the ditches are still deep and icy. Oddly enough,
Safety is not just about staying warm; it is about staying alive.
So, there you have it.
Catching the Northern Lights is a bit of a puzzle.
You have to put together the Kp index, the cloud cover, the moon phase, and your own luck.
It is a hunt, really.
And sometimes, you come home empty-handed.
But when you finally see that first wave of green dancing across the sky, all the waiting and the checking of apps is totally worth it. Now think about that for a second.
Just remember to keep looking up.
You never know when the show is going to start.
Image Source: pexels.com
But there’s a catch.
Image source credit: pexels.com